Introduction
Chemical injectors play a critical role in industrial laundry operations, delivering accurate chemical dosing during wash cycles. These precision devices use water pressure differentials to create vacuum and draw chemicals into the water stream—no electricity required.
When functioning properly, they ensure consistent wash quality and optimal chemical usage.
Water leaking from the chemical intake line ranks among the most common and disruptive injector failures. This symptom indicates the injector pushes water backward instead of creating vacuum to pull chemical forward—a clear sign of lost vacuum or back pressure issues. Left unaddressed, these leaks dilute chemical concentrations, compromise wash quality, and increase rewash costs.
Identifying and fixing the root cause quickly restores proper operation and prevents costly production delays.
This guide covers:
- Systematic troubleshooting steps for leak diagnosis
- Common root causes of injector failures
- Repair procedures for specific failure points
- When to replace versus repair chemical injectors
By following a methodical diagnostic approach, maintenance teams can quickly isolate the exact failure point and minimize downtime.
TLDR
- Leaks typically result from venturi vacuum loss caused by debris, worn check valves, or downstream back pressure
- Isolate the problem by removing downstream components one at a time to locate back pressure source
- Repair intact venturi bodies; replace corroded or chemically-damaged units
- Seek professional help when leaks persist after repairs or with automated chemical systems
What Is a Chemical Injector?
A chemical injector uses water pressure differential to create vacuum and draw chemicals into the water stream without requiring electricity. This design makes injectors reliable workhorses in industrial laundry environments where electrical components face harsh conditions.
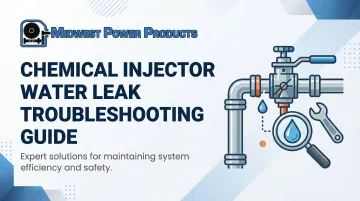
Basic Operation
High-pressure water flows through a narrowed venturi section inside the injector body. As water accelerates through this constriction, its velocity increases while its pressure decreases—a principle known as the Bernoulli effect.
This pressure drop creates a vacuum at the suction port, drawing chemical from a supply tank through the intake tube.
For this mechanism to work effectively, the injector requires a pressure differential of at least 25-30% between inlet and outlet to generate sufficient vacuum. If outlet pressure exceeds approximately 70-75% of inlet pressure, suction stops entirely.
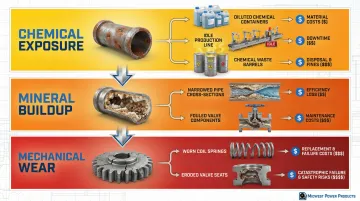
Components That Experience Wear
Chemical injectors experience wear from several sources:
- Chemical exposure: Acids and alkalis corroding metal components or degrading seals
- Mineral buildup: Hard water scaling venturi passages and reducing throat diameter
- Mechanical stress: Constant pressure cycling wearing check valves and seals
Operators must inspect and maintain injectors periodically to ensure consistent performance and prevent costly failures during production cycles.
Common Problems With Chemical Injector Water Leaks
When water leaks from the chemical intake line, the injector pushes water backward instead of creating vacuum to pull chemical forward. This happens when two things fail simultaneously: loss of vacuum (hydraulic failure) and breach of the check valve (mechanical failure).
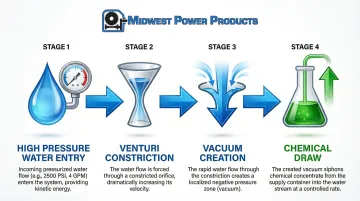
The five most common causes are outlined below.
Problem 1: Check Valve Failure
Symptoms:
- Water flows into chemical supply tank, diluting chemicals
- No chemical draw even with proper water pressure
- Gurgling sounds or bubbles visible in chemical tank
- Water spurts from intake barb when system is pressurized but not flowing
Likely Cause:
Chemical deposits, spring failure, or debris lodge in the valve seat, preventing the ball check valve from sealing properly.
The check valve is the final barrier between the water line and chemical container—when it fails, water flows backward whenever the injector isn't actively creating vacuum.
Problem 2: Venturi Body Obstruction or Damage
Symptoms:
- Reduced or no vacuum at intake port
- Water pressure seems normal but no chemical suction
- Visible scale buildup or corrosion on injector body
- Injector fails vacuum test (no suction when finger placed over intake)
Likely Cause:
Mineral deposits narrowing the venturi throat, chemical etching of venturi surfaces, or physical damage to the precision-machined venturi section disrupting the pressure differential. Even small changes in throat geometry can eliminate vacuum generation.
Problem 3: Downstream Back Pressure
Symptoms:
- Injector works when tested alone but fails when connected to system
- Water backs up into chemical line when trigger gun or valve is closed
- Chemical draw stops when certain nozzles or attachments are added
- Inconsistent chemical draw depending on operating conditions
Likely Cause:
Restricted hoses, undersized fittings, clogged spray nozzles, or incompatible valves create excessive back pressure that overcomes injector vacuum. When outlet pressure rises too high, it collapses the pressure differential needed for suction.
Problem 4: Air Leak on Pump Inlet Side
Symptoms:
- Inconsistent chemical draw
- Cavitation sounds from pump
- Vibrating high-pressure hose
- Injector works intermittently
Likely Cause:
Loose inlet connections, cracked inlet hose, or worn pump inlet seals allowing air into the system and disrupting consistent pressure needed for the venturi effect. Air leaks cause pressure fluctuations that prevent stable vacuum generation.
Problem 5: Incorrect Injector Sizing
Symptoms:
- Little to no chemical draw from day one of installation
- Water occasionally backs into chemical line under certain operating conditions
- System flow rate seems restricted
- Chemical draw rate doesn't match specifications
Likely Cause:
The injector's GPM rating doesn't match your system's flow rate. Oversized injectors can't create sufficient vacuum because water velocity through the venturi throat is too low. Undersized injectors create excessive back pressure and reduce system flow—both cause poor chemical draw and potential leaks.
Why Chemical Injectors Fail (Root Causes)
Chemical injectors fail primarily due to three primary factors that accelerate wear in industrial laundry environments.
Chemical Exposure
Acids and alkalis corrode metal components or degrade elastomer seals. Strong oxidizers and acids attack standard brass and stainless steel components, requiring PVDF (Kynar) bodies and ceramic check balls for aggressive chemical applications. Incompatible materials can fail within months rather than years.
Mineral Buildup
Water hardness above 7 grains per gallon (gpg) significantly increases the risk of mineral scaling inside the injector throat.
Calcium carbonate deposits progressively narrow venturi passages, roughen precision-machined surfaces, and foul check valves—disrupting the hydraulic conditions needed for vacuum generation.
Mechanical Wear
Constant pressure cycling wears check valve springs, erodes valve seats, and degrades o-rings and seals. High-pressure water flowing at velocity gradually erodes even stainless steel components over time.
Consequences of Ignoring Early Warning Signs
These three failure modes create cascading operational problems when left unaddressed:
- Diluted chemical concentrations lead to poor wash quality—industry standards aim for rewash rates of 3-5%, but failed dosing can push this significantly higher, increasing labor, water, and chemical costs per pound
- Complete injector failure causes production downtime—unplanned downtime in industrial operations can cost thousands of dollars per minute, with additional penalties for missed delivery schedules
- Chemical waste from backward flow increases operating costs—leaking intake lines dilute chemical concentrate in supply drums, ruining stock and creating direct financial loss
Risks in Industrial Laundry Environments
High-temperature water (approaching 195°F) accelerates corrosion and can soften plastic injector bodies or degrade standard elastomer seals. Varied chemical types—detergents, bleaches, softeners, acids—stress different injector materials simultaneously.
Continuous operation amplifies wear compared to intermittent residential use, making maintenance schedules critical.
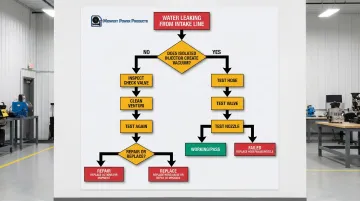
How to Fix Chemical Injector Water Leaks (Step-by-Step)
Systematic component isolation pinpoints the exact failure point. Skipping diagnostic steps leads to replacing functional parts while the actual problem remains.
Step 1: Verify the Problem and Establish Baseline
Shut down safely and observe:
- Does water continue to flow into chemical tank after shutdown?
- Does chemical line remain pressurized?
- When does the leak appear—during startup, continuous operation, or shutdown?
Record current operating parameters:
- Water pressure (PSI)
- Flow rate (GPM)
- Chemical concentration being drawn (if measurable)
- When the leak occurs
Inspect chemical supply:
- Check supply tank and intake filter for debris
- Verify chemical type and concentration match injector specifications
- Confirm intake tube reaches proper depth in tank (not drawing air)
Step 2: Isolate the Injector and Test for Vacuum
Disconnect downstream components to perform the critical diagnostic test:
- Remove all hoses, guns, nozzles downstream of the injector
- Remove chemical supply line from injector inlet barb
- Direct water flow from injector outlet into a safe drain area (water will shoot 15-20 feet)
Test for vacuum:
- Start system and allow water to flow through injector
- Place finger firmly over inlet barb
- You should feel strong suction pulling your finger against the barb
Interpret results:
- Strong vacuum present: The injector venturi is functional—the problem is downstream back pressure
- No vacuum or weak vacuum: The injector itself has failed and needs repair or replacement
Step 3: Identify Back Pressure Source (If Injector Tests Good)
When the injector generates strong vacuum during isolated testing, the problem lies downstream. Systematically reconnect components one at a time to identify the back pressure source.
Test outlet hose:
- Reconnect only the outlet hose to injector with open end directed to drain
- Test for vacuum at inlet barb
- Loss of vacuum indicates internal hose swelling or collapse restricting flow—replace the hose
Test trigger gun or control valve:
- Add trigger gun or control valve with no nozzle attached
- Test vacuum again
- Loss of vacuum indicates the valve/gun orifice is too small or the valve is malfunctioning
- Use 12-13 GPM guns with larger 13/32" ball for higher flow industrial systems
Test spray nozzle:
- Finally add spray nozzle or distribution manifold
- Vacuum loss at this stage indicates a clogged or undersized nozzle
- Clean or replace with properly-sized nozzle
Component sizing guidelines:
- Trigger guns rated for system GPM (minimum 12-13 GPM for most industrial applications)
- Hose diameter adequate for flow (minimum 3/8" ID for industrial applications)
- Nozzle orifice size matched to pressure and flow requirements
Step 4: Repair or Replace the Injector (If Injector Tests Bad)
When the isolated injector fails the vacuum test, internal component failure is confirmed.
Address check valve failures:
- Disassemble inlet barb assembly carefully (watch for spring under tension)
- Inspect ball and seat for debris, chemical deposits, or physical damage
- Clean with appropriate solvent or replace check valve components from repair kit
- Verify spring tension is adequate to close valve
Remove mineral scaling:
- Soak venturi body in appropriate descaling solution (citric acid for mineral deposits)
- Never use harsh acids on brass injectors—they cause corrosion
- Flush thoroughly with clean water
- Retest for vacuum generation
Replace corroded or damaged injectors:
- Venturi bodies showing corrosion, pitting, or chemical etching require replacement—it's more cost-effective than repair
- Degraded or brittle o-rings and seals should be replaced to prevent recurring failures
- Match replacement injector to system GPM rating
- Select chemically-compatible materials (stainless steel or PVDF for acidic/caustic chemicals)
Step 5: Address Upstream Issues (Air Leaks)
Even with a functioning injector, upstream air leaks disrupt the consistent pressure needed for proper venturi operation.
Inspect pump inlet connections:
- Check supply hose for cracks or damage
- Verify strainer basket seats properly with intact o-ring seal
- Tighten all inlet-side hose clamps
Check for pump wear:
- Listen for unusual pump noise indicating cavitation
- Look for water leaking from pump case (inlet seal failure)
- Rebuild or replace pump if inlet seals are compromised
Step 6: Test System Under Operating Conditions
Complete system testing under normal operating conditions confirms the repair.
Run complete test cycle:
- Reconnect all components
- Fill chemical tank with test solution (water with food coloring works well)
- Start system and run through complete operating cycle
Verify proper chemical draw:
- Time how long it takes to draw a measured volume from supply tank
- Confirm this matches injector specifications and chemical dilution requirements
- Monitor for any water backup into chemical line during startup, operation, and shutdown
Extended monitoring:
- Monitor system for 24-48 hours of normal operation
- Verify leak does not recur under varying load conditions
- Document baseline performance for future comparison
When Should You Fix vs Replace a Chemical Injector?
After diagnosing the leak source, you face a practical decision: repair or replace? The answer depends on injector condition, age, downtime costs, and whether the failure signals broader system problems.
Scenario 1: Simple Check Valve or O-Ring Failure
Fix: Repair makes sense when:
- Injector body shows no corrosion
- Venturi passages remain clear
- Only check valve components or seals have failed
OEM parts kits cost $8-20 versus $30-100+ for new injectors, with 15-30 minutes labor time for most repairs.
Replace: Choose replacement when the injector fails repeatedly within a short period, repair kits aren't available for your model, or disassembly reveals hidden corrosion or venturi surface damage.
Scenario 2: Mineral Scaling or Light Corrosion
Fix: Scaling limited to accessible surfaces can be removed with appropriate cleaning solutions. Return the injector to service after testing confirms proper function, then improve water treatment to prevent recurrence.
Replace: Replace when scaling narrows the venturi throat beyond recovery, corrosion pits venturi surfaces (affecting vacuum generation), or cleaning fails to restore function. Physical erosion of the venturi throat cannot be repaired.
Scenario 3: Chemical Compatibility Issues
Fix: Not applicable—wrong material selection cannot be repaired.
Replace: Upgrade immediately to chemically-compatible injector material. Stainless steel or PVDF works for acids/caustics, while ceramic check balls handle aggressive chemicals, preventing rapid re-failure and safety hazards.
Scenario 4: Aging Injector with Multiple Wear Points
Fix: Injectors less than 3 years old operating in normal conditions with isolated failures can gain 1-2 additional service years through repair.
Replace: Replace injectors 5+ years old with repair histories, those operating in harsh chemical/temperature environments, or when repair costs approach 50% of replacement cost. New injectors provide reliability and often improved efficiency.
Common Mistakes to Avoid When Troubleshooting Chemical Injector Leaks
Avoid these common troubleshooting errors that lead to recurring injector failures:
- Replacing injectors without testing downstream back pressure - Undersized hoses, clogged nozzles, or incorrect trigger guns create system resistance that destroys new injectors immediately. Always perform isolation testing first.
- Using incompatible chemicals in brass injectors - Leaving aggressive chemicals in the system overnight corrodes venturi surfaces and check valve components, reducing injector lifespan from years to months.
- Failing to verify proper injector sizing - Low water velocity in oversized injectors prevents adequate vacuum generation. Undersized injectors create back pressure and restrict flow. Both scenarios cause poor chemical draw and leaks.
- Ignoring water quality problems - Hard water mineral buildup and sediment narrow venturi passages and foul check valves over time. Install filtration or water treatment to prevent recurring failures.
Preventive Measures to Avoid Future Chemical Injector Issues
Systematic preventive maintenance significantly extends injector life and prevents costly production downtime, with proper care often tripling equipment longevity.
Regular Inspection Schedule
Weekly visual checks:
- Inspect for leaks at all connections
- Verify proper chemical draw rates
- Check chemical supply tank levels and cleanliness
Monthly detailed inspection:
- Test vacuum strength at inlet barb
- Verify chemical concentration accuracy
- Inspect for visible corrosion or mineral buildup
Quarterly maintenance:
- Disassemble and clean check valves
- Inspect and clean inlet filters and screens
- Replace worn o-rings and seals before failure
Chemical Handling Protocols
Flush injectors with clean water after using aggressive chemicals (acids, bleaches, caustic solutions). Never leave strong chemicals sitting in injector system overnight—this accelerates corrosion and seal degradation.
Material selection matters significantly for longevity. PVDF bodies and ceramic check balls resist aggressive chemicals far better than brass or standard stainless steel, making them essential for facilities using harsh cleaning agents.
Water Treatment
Beyond chemical compatibility, water quality directly impacts injector performance. Proper water treatment upstream of chemical injection systems includes:
- Water softeners for hardness above 7 gpg
- 200-mesh (80 micron) strainers to prevent debris from entering injector
- Regular filter maintenance to maintain flow rates
Supply tank cleanliness prevents debris from entering the injector and contaminating the system.
Detailed maintenance logs help identify failure patterns early, allowing you to address recurring issues before they cause downtime.
Consider Automated Chemical Dispensing Systems
For facilities looking to reduce maintenance requirements while improving chemical accuracy, Softrol's Catalyst chemical dispensing systems offer advanced automation. These systems use flow meter-based injection technology with volumetric injection and water flush verification, providing immediate feedback and alarms for chemical delivery failures.
Integration with LOIS (Laundry Operation Information System) enables 24/7 monitoring with real-time alerts via email, allowing maintenance teams to address issues before they cause production disruptions.
Conclusion
Chemical injector water leaks typically result from check valve failure, venturi obstruction, or downstream back pressure.
Systematic troubleshooting using component isolation testing pinpoints the specific cause quickly and accurately, preventing unnecessary parts replacement and reducing downtime.
Once you've identified the problem, you can fix most injector issues when caught early through regular inspection. However, knowing when to replace rather than repeatedly repair saves time and money while maintaining wash quality and production efficiency.
Replace injectors with corroded venturi bodies, chemical damage, or multiple failure points rather than attempting repeated repairs. Use properly-sized, chemically-compatible units for optimal performance.
Preventive maintenance extends injector life significantly and prevents costly production disruptions:
- Weekly: Visual inspections for leaks and wear
- Monthly: Vacuum testing to verify injector draw
- Quarterly: Cleaning of check valves and venturi
- Ongoing: Proper water treatment to prevent mineral buildup
This proactive approach catches small issues before they become expensive failures.
Frequently Asked Questions
What happens if you get water in your injectors?
Water backing into your chemical tank dilutes the solution and signals the injector has lost vacuum-generating ability. This requires immediate troubleshooting to prevent chemical waste and poor wash quality.
How do I know if my chemical injector is failing?
Watch for inconsistent chemical draw rates, water in the supply tank, declining wash quality, or visible corrosion on the injector body. These symptoms require immediate attention to prevent complete failure.
Can a chemical injector be repaired or must it be replaced?
Simple issues like check valve failures, worn o-rings, or mineral scaling can be repaired with parts kits ($8-20). Replace units with corroded venturi bodies, chemical damage, or multiple failures.
What size chemical injector do I need for my system?
Match injector size to your system's GPM rating—undersized units create back pressure while oversized units lack adequate vacuum. Consult equipment specifications or a professional for proper sizing.
How often should chemical injectors be inspected?
Inspect weekly for leaks and proper operation, perform monthly vacuum and concentration tests, and conduct quarterly maintenance with disassembly and cleaning. This schedule prevents most failures.
Why does my injector work when tested alone but fail when connected to the system?
Downstream back pressure from restricted hoses, undersized fittings, clogged nozzles, or incompatible valves overcomes the injector's vacuum. Test each downstream component to identify the restriction point.